Sega Dreamcast PCB Controller Board Port Fix Repair Kit Lot (LED, Battery, Etc)
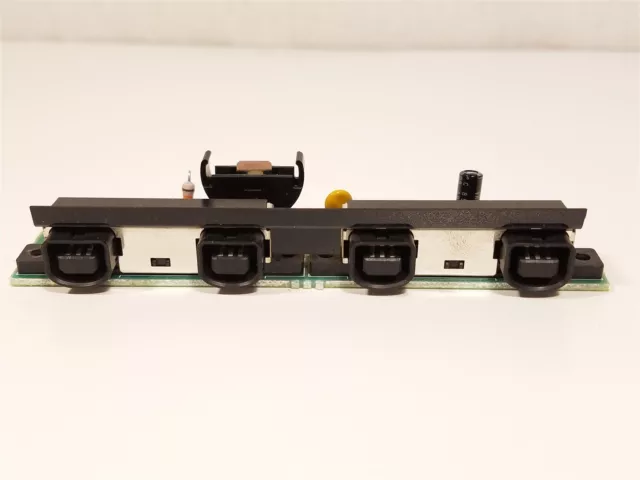
- This is a kit for your Sega Dreamcast's controller PCB board to fix your controllers not working.
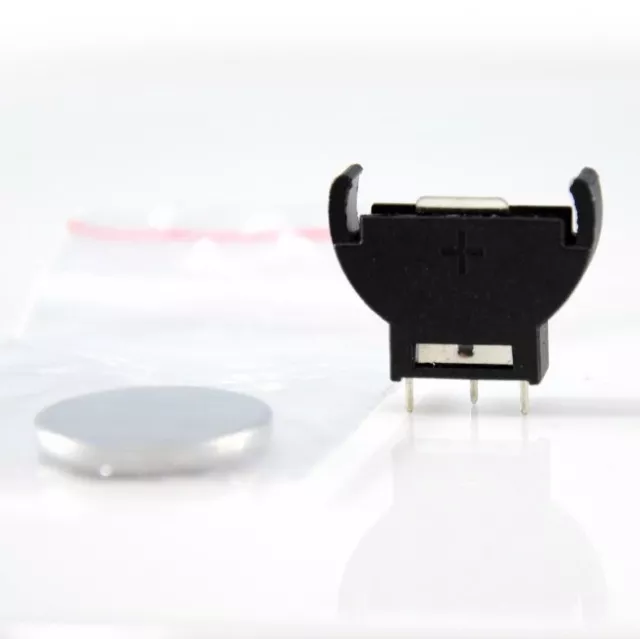
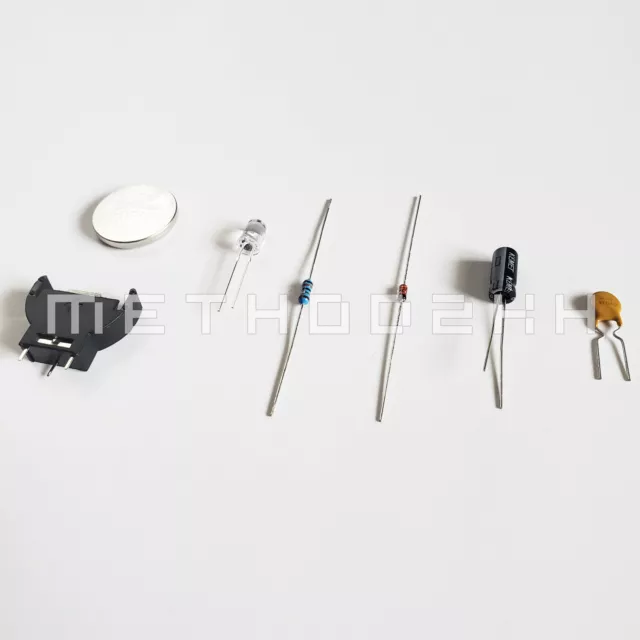
- Included is a CR2032 battery, a vertical battery holder, fuse, capacitor, resistor, schottly diode, and LED color of your choice.
- This will be shipped USPS Letter with no tracking number, it should arrive the same as any normal USPS Ground Advantage package. If you would like a tracking number please select the $2 up-charge during your checkout.
- This will contain a brand new CR2032 battery, and replacement battery holder. The original battery is soldered in, so this will make replacing the battery in the future much easier.
- There are two positive terminals and one negative, desolder the original battery, and solder in the new battery holder. Take precaution, as the legs are thin to fit the holes of the PCB board and they bend easy.
- The CR2032 battery in this kit is a 3V battery, which matches the same voltage of the original coin battery. Never use a coin battery that has a different voltage rating other than 3V. You don't need an ML variant, this works just as good.
- A schottky diode will be included in this kit. This is to be soldered to the resistor to block the recharge path from the CR2032.
- The specs are: BAT85, 30V, 200MA, DO34
- Polarity matters! The black ring on the diode goes closer to the PCB, the orange part goes closer to the resistor!
- A blown fuse is the main reason why the controller PCB board is dead. The original fuses that Sega used were not "resettable", meaning once blown, they are dead forever. The fuse included in the kit is resettable, meaning it will last forever even if blown.
- The specification is 72V 400mA.
- It does not matter the orientation when you solder this in.
- These are less prone to failure, but a good idea to replace if you are working on the PCB board anyways.
- The specification is 47uF 10V.
- The orientation matters! There is a white strip that goes along the capacitor that must go with the white spot on the PCB board. In addition, there is a solder point in the middle that must be there!
- Similar to the capacitor, this should be replaced to preserve the longevity of the PCB board.
- The specification is 13 OHM 1/2 Watt 1% tolerance. Beware of those with 5% tolerance, this 1% variant is superior.
- The orientation does not matter, in the original design the resistor is closer to the battery holder, I usually keep it that way. I have mixed up the orientation in the past by mistake and it did not make a difference.
- I have the following colors in stock: Red/Orange/Yellow/Green/Blue/White/Pink/Purple(UV)/Chartreuse/Warm-white. (please message me your choice or write it in a message during checkout)
- These are 5mm and look fantastic in the Dreamcast. I did notice that the UV one is somewhat dim. If you have a translucent aftermarket case, this is a nice addition. Match the LED with your favorite color controller why not!
- The orientation matters. The longer leg is called the anode, the shorter leg is the cathode.
- If looking at the board where the parts from left to right are: capacitor, fuse, resistor, battery. Then the cathode (shorter leg) is to left, the anode (longer leg is to the right). I highly suggest taking a photo of the original LED's orientation to avoid confusion.
- A random colored LED will be included by default if you do not state a color in the checkout notes or message me afterwards.
- What happens if you mess up?? Lets say you rip a pad clean off: look on the underside of the PCB board, everything traces back to the ribbon. So lets say you messed up on the LED? You can solder in a small wire that goes from one leg of the LED where you messed up, to one of the points of the ribbon area. Please be very careful with this, as you can destroy your Dreamcast if you wire points incorrectly! I have done this successfully with an LED and battery. I am not too sure about the fuse, cap, or res.
- I find the solder on some boards to be very stubborn, I have no idea why. Always apply new solder to the points before doing a desolder. I have done boards that this is not completely necessary, in this case IT IS. Use a solder sucker in conjunction with copper braid. Put a small bit of flux on the tip of the braid, it will make the desoldering process way easier. If you have one of those expensive Hakko desoldering tools, then you probably are a golden god of soldering and don't need to be reading any of this.
- This is to be considered a semi-professional job. If you have minimal experience, this is not the job for you. I am pretty dang good at soldering, and these boards still annoy the heck outta me! Once you get the old solder and old components off, it is smooth sailing, but up until that point you may tear your hair out trying to desolder the components! The pads are also very sensitive and can be ripped easy.
- If you need help, ask away! Purchase this with peace of mind knowing you are buying from someone who has extreme experience soldering these in.
Location | Service | 1st Item | Additional |
USA | USPS Letter (No Tracking) | Free | Free |
USA | USPS Ground Advantage | $2 | Free |
| USA | USPS Priority | $7 | Free |
Insurance:
Insurance is included on all purchases, protecting against loss or damage during transit. If you would like signature confirmation, it is an additional $2.65. If your package is stolen once delivered, USPS nor myself are responsible. If the order has a total cost (including shipping costs and any taxes) of $750 or more, the seller is required to purchase signature confirmation. Please contact me prior to your purchase if you are interested in this service.
Return Policy:
All items are guaranteed against D.O.A. (dead/defective on arrival). If by chance your item is non-functional upon arriving, or not as described in the ad, a refund will be given up to 30 days of ad closing. Refunds will only be granted based upon this criteria. Buyer must pay for return shipment, and actual shipping costs will be deducted from the refund as well. Item must be returned in original condition complete with all material.
International Buyers:
Please note that customs duties and taxes are solely the responsibility of the buyer. In addition, the time frame in which an international package takes to arrive might fluctuate based on it's clearance through customs. The USPS, eBay, or myself have no control over this aspect and will not be held responsible.
For any further inquiries, feel more than free to contact me 24/7!!!
Thanks for looking & have a great day!!
- Condition: New
- Type: PCB Components
- Compatible Model: Sega Dreamcast
- Brand: Unbranded
PicClick Insights - Sega Dreamcast PCB Controller Board Port Fix Repair Kit Lot (LED, Battery, Etc) PicClick Exclusive
- Popularity - 308 watchers, 0.3 new watchers per day, 1,082 days for sale on eBay. Super high amount watching. 1,114 sold, 10 available.
- Best Price -
- Seller - 6,730+ items sold. 0% negative feedback. Great seller with very good positive feedback and over 50 ratings.
People Also Loved PicClick Exclusive

Sega Dreamcast PCB Controller Board Port Fix Repair Kit Lot With *Proper Battery
$9.94 Buy It Now 8d 11h
Sega Dreamcast Controller Port Repair Fix Kit Fuse Resistor Capacitor Holder
$8.75 Buy It Now 16d 8h
PCB Controller Board Port Battery Holder with Clock Battery For Sega Dreamcast
$9.39 Buy It Now 29d 8h
Sega Dreamcast Power LED Mod Kit Battery Holder
$7.99 Buy It Now 28d 7h
SEGA Dreamcast Repair / Mod Kit / Controller Port Fix / Battery Holder / LED etc
$4.97 Buy It Now 13d 21h 7 watchers
 Sega Dreamcast 2 Pin Controller Port Board PCB w/ Battery Holder/Resettable Fuse$59.99 Buy It Now or Best Offer
 7 watchers
 Sega Dreamcast 3 Pin Controller Port Board PCB w/ Battery Holder/Resettable Fuse$59.99 Buy It Now or Best Offer


